Published 2021-02-13
Vapor Microservices CI/CD in AWS Part 2
In my first blog post we deployed the UsersService microservice. In this blog post we will continue with the ProductsService microservice. The ProductsService microservice will use the jwt access tokens we received when logging in with the UsersService microservice to verify that the user is allowed to perform the operations it requests. It will do this by verifying the JWT Payload it receives in the Authorize header.
In the first blog post we created a Shop folder that contains the UsersService folder. We will create another folder in the Shop folder for ProductsService.
Project setup
I have prepared a template repository for ProductsService. Use this template to create a new GitHub repository in your GitHub account, and give it a name. I named my ProductsService.
Open up the ProductsService in Xcode. Like we did in the first blog post, click Edit Scheme... and set the working directory to ProductsService. This enables us to test the service locally.
Testing ProductsService locally
Copy the .env.development file you created for UsersService over to ProductsService:
cp ../UsersService/.env.development . You can delete the SENDGRID_API_KEY line from the file, because we will not use it in this microservice.
Start the ProductsService microservice in Xcode, and try the a curl command:
curl -i --request GET \http://localhost:8080/api/health
You should get a statusCode 200 back, and a body containing the string All good!.
If you try to list all products with this command, you will see that you are not authorized:
curl -i --request GET \http://localhost:8080/api/products
You will receive the JSON with content: {"error":"Abort.401: Payload not authenticated."} We will fix that when we deploy the pipeline.
CDK Setup
Make a new folder directly under the ProductsService folder:
mkdir cdk && cd cdk
Then initialize cdk with the TypeScript language:
cdk init --language typescript
Open up the project with Visual Studio Code: Add the following to the cdk.json file:
"@aws-cdk/core:newStyleStackSynthesis": true
We are now ready to add the infrastructure code to deploy the microservice to AWS.
Setup of Vapor app and mongo container into ECS docker containers
We need to install some @aws-cdk dependencies first with npm, so we can use them in CdkStack:
npm install @aws-cdk/aws-ec2 @aws-cdk/aws-ecs @aws-cdk/aws-ecs-patterns @aws-cdk/aws-ecr @aws-cdk/aws-iam @aws-cdk/aws-secretsmanager
Remove everything from the file cdk-stack.ts, and add this to the top of the file:
import { Stack, Construct, StackProps } from '@aws-cdk/core'
import { Vpc, SecurityGroup } from '@aws-cdk/aws-ec2'
import { FargateTaskDefinition, Cluster, ContainerImage, LogDriver, Secret } from '@aws-cdk/aws-ecs'
import { ApplicationLoadBalancedFargateService } from '@aws-cdk/aws-ecs-patterns'
import { Repository } from '@aws-cdk/aws-ecr'
import * as secretsManager from '@aws-cdk/aws-secretsmanager'

export class CdkStack extends Stack {
  constructor(scope: Construct, id: string, props?: StackProps) {
    super(scope, id, props);

  }
}
Inside the CdkStack constructor, define the variables for secretMongoDB and secretJwksKeypair. We added the secrets for these in Secrets Manager in part 1 of this blog post. Use your own Account ID here.
We also created a VPC in last blog post, so now we just need to lookup the VPC and store it in the usersVpc variable, so that we can reuse it.
The same with the three security groups, we just lookup the security groups that was created when we created the UsersService microservice. Check with your EC2 console to find the security group ids.
We can reuse the cluster we created for UsersService, named Shop, so our microservice will run in the same cluster:
const secretMongoDB = secretsManager.Secret.fromSecretCompleteArn(this, 'prod/service/Shop/mongodb', 'arn:aws:secretsmanager:eu-west-1:<Account ID>:secret:prod/service/Shop/mongodb-oZHRVQ')
const secretJwksKeypair = secretsManager.Secret.fromSecretCompleteArn(this, 'prod/service/jwt/jwkskeypair', 'arn:aws:secretsmanager:eu-west-1:<Account ID>:secret:prod/service/jwt/jwkskeypair-567S6x')

const usersVpc = Vpc.fromLookup(this, "UsersServiceVpc", {
  vpcName: "CicdUsersInfraStack/AppDeployLocal/Users/UsersServiceVpc"
})

const securityGroup1 = SecurityGroup.fromLookup(this, 'secGroup1', 'sg-00770032e8d9323cb')
const securityGroup2 = SecurityGroup.fromLookup(this, 'secGroup2', 'sg-02564d008eacde49f')
const securityGroup3 = SecurityGroup.fromLookup(this, 'secGroup3', 'sg-074842db183f08b0d')

const cluster = Cluster.fromClusterAttributes(this, "UsersServiceCluster", {
  vpc: usersVpc,
  clusterName: "Shop",
  securityGroups: [
    securityGroup1,
    securityGroup2,
    securityGroup3
  ]
})
We will create two task definition containers, one for the Vapor app, and one for the Mongo database. For the Vapor app we will use the ECR repository with name cdk-cicd/productsapp which have been created by the CicdInfraStack. We keep the tag for the Vapor app container image in the variable imageTag. The vaporApp task definition imports the secrets as environment variables. Add port mappings to port 8080.
const repository = Repository.fromRepositoryName(this, 'Repository', 'cdk-cicd/productsapp')
const imageTag = process.env.CODEBUILD_RESOLVED_SOURCE_VERSION || 'local'

const taskDefinition = new FargateTaskDefinition(this, 'ProductsServiceTaskDefinition', {
  family: "ProductsTaskDefinition",
  cpu: 1024,
  memoryLimitMiB: 2048
})

const vaporApp = taskDefinition.addContainer('ProductApp', {
  image: ContainerImage.fromEcrRepository(repository, imageTag),
  logging: LogDriver.awsLogs({streamPrefix: 'products'}),
  memoryReservationMiB: 1024,
  secrets: {
    JWKS_KEYPAIR: Secret.fromSecretsManager(secretJwksKeypair),
    MONGODB: Secret.fromSecretsManager(secretMongoDB)
  }
})

vaporApp.addPortMappings({containerPort: 8080, hostPort: 8080})
The mongo database task definition container is much easier, as we just need to fetch it from the public docker registry. We add port mappings to the mongo port 27017.
const mongo = taskDefinition.addContainer('MongoDB', {
  image: ContainerImage.fromRegistry('mongo:latest'),
  memoryReservationMiB: 1024
})

mongo.addPortMappings({containerPort: 27017, hostPort: 27017})
To complete the CdkStack, we add the Application Load Balancer, and configures the health check path to the same as we configured in the routes.swift file:
const service = new ApplicationLoadBalancedFargateService(this, 'ProductsServiceFargateService', {
  serviceName: 'ProductsService',
  cluster: cluster,
  cpu: 512,
  desiredCount: 1,
  taskDefinition: taskDefinition,
  publicLoadBalancer: true
})

service.targetGroup.configureHealthCheck({
  path: '/api/health'
})
Local Deployment Stage
Before we start with the CI/CD pipeline, we will create the pipeline stage for the deployment of the infrastructure we just added in CdkStack. Add a new file named product-deployment.ts in the lib folder. Add the following code to it:
import { Stage, StageProps, Construct } from '@aws-cdk/core'
import { CdkStack } from './cdk-stack'

export class ProductDeploymentStage extends Stage {
    constructor(scope: Construct, id: string, props?: StageProps) {
        super(scope, id, props);

        new CdkStack(this, 'ProductManager', {
            stackName: "ProductManager",
            env: {
                'account': process.env['CDK_DEFAULT_ACCOUNT'],
                'region': process.env['CDK_DEFAULT_REGION']
            }
        })
    }
}
CI/CD Infra Pipeline
Now we are ready to make the CI/CD pipeline. Make a new file named cicd-infra.ts in the lib folder. It will contain the infrastructure code for the CI/CD pipeline.
The pipeline stack depends on the pipelines and aws-codepipeline-actions, so we need to install these with npm:
npm install @aws-cdk/pipelines @aws-cdk/aws-codepipeline @aws-cdk/aws-codepipeline-actions @aws-cdk/aws-codebuild
Add the code for the CicdInfraStack class:
import { Stack, Construct, StackProps, SecretValue } from '@aws-cdk/core'
import { Artifact } from '@aws-cdk/aws-codepipeline'
import { GitHubSourceAction, CodeBuildAction } from '@aws-cdk/aws-codepipeline-actions'
import { LinuxBuildImage, Project, BuildSpec } from '@aws-cdk/aws-codebuild'
import { Repository } from '@aws-cdk/aws-ecr'
import { Role, PolicyStatement, Effect } from '@aws-cdk/aws-iam'
import { CdkPipeline, SimpleSynthAction } from '@aws-cdk/pipelines'
import { Secret } from '@aws-cdk/aws-secretsmanager'

import { ProductDeploymentStage } from './product-deployment'

export class CicdInfraStack extends Stack {
    constructor(scope: Construct, id: string, props?: StackProps) {
        super(scope, id, props)

    }
}
Inside the constructor, add the code for the pipeline. The sourceArtifact is the artifact that contains the source code pulled from the GitHub repository. The cdkOutputArtifact is the output from the synth action:
const sourceArtifact = new Artifact()
const cdkOutputArtifact = new Artifact("ProductsBucket")

const pipeline = new CdkPipeline(this, 'CdkPipeline', {
    pipelineName: 'cdk-products-pipeline',
    cloudAssemblyArtifact: cdkOutputArtifact,

    sourceAction: new GitHubSourceAction({
        actionName: 'DownloadSources',
        owner: '<GitHub User>',
        repo: 'ProductsService',
        branch: 'main',
        oauthToken: SecretValue.secretsManager('github-token'),
        output: sourceArtifact
    }),

    synthAction: SimpleSynthAction.standardNpmSynth({
        sourceArtifact: sourceArtifact,
        cloudAssemblyArtifact: cdkOutputArtifact,
        subdirectory: 'cdk'
    })
})
Next, we creates the repository that will keep the Vapor docker image, creates a build role that is granted the pull and push policy so that the pipeline can pull and push the repository.
const repository = new Repository(this, 'Repository', { repositoryName: 'cdk-cicd/productsapp' })

const buildRole = Role.fromRoleArn(this, 'BackendTaskRole', 'arn:aws:iam::<Account ID>:role/DockerBuildRole')
repository.grantPullPush(buildRole)
We create a buildspec project that uses the buildRole, and adds the policies to the project to read from the Secrets manager.
const mongoSecret = new Secret(this, 'mongodb')

const project = new Project(this, 'DockerBuild', {
    role: buildRole,
    environment: {
        buildImage: LinuxBuildImage.STANDARD_4_0,
        privileged: true
    },
    buildSpec: this.getDockerBuildSpec(repository.repositoryUri)
});
The last in the constructor is the creation of the buildStage that builds the Vapor application with Swift. The buildStage is added to the pipeline as a new stage:
const buildStage = pipeline.addStage('AppBuild')
buildStage.addActions(new CodeBuildAction({
    actionName: 'DockerBuild',
    input: sourceArtifact,
    project: project
}))

// Deploy - Local
const localStage = new ProductDeploymentStage(this, 'AppDeployLocal')
pipeline.addApplicationStage(localStage)
Finally, we add the function getDockerBuildSpec to the CicdInfraStack class, which is used by the buildspec project. The function logs into our private ECR repository before building the Vapor docker image. After the build have completed, the Vapor docker image is pushed to the ECR repository. I have tried to find a way to do incremental building of the Vapor image, but haven't succeeded in that yet, so every build of the Vapor image is a full build every time we push to the GitHub repository:
getDockerBuildSpec(repositoryUri: string): BuildSpec {
    return BuildSpec.fromObject({
        version: '0.2',
        phases: {
            pre_build: {
                commands: [
                    'echo Logging in to Amazon ECR...',
                    '$(aws ecr get-login --no-include-email --region $AWS_DEFAULT_REGION)'
                ]
            },
            build: {
                commands: [
                    'echo Build started on `date`',
                    'echo Building the Docker image...',
                    `docker build -t ${repositoryUri}:$CODEBUILD_RESOLVED_SOURCE_VERSION .`
                ]
            },
            post_build: {
                commands: [
                    'echo Build completed on `date`',
                    'echo Pushing the Docker image...',
                    `docker push ${repositoryUri}:$CODEBUILD_RESOLVED_SOURCE_VERSION`
                ]
            }
        }
    })
}
CDK Application
Modify the cdk application entrypoint in the bin/cdk.ts file to load the CicdInfraStack stack. It should look like this:
#!/usr/bin/env node
import 'source-map-support/register'
import { App } from '@aws-cdk/core'
import { CicdInfraStack } from '../lib/cicd-infra'

const app = new App();
new CicdInfraStack(app, 'CicdProductsInfraStack', {
    stackName: "CicdProductsInfraStack",
    env: {
        'account': process.env['CDK_DEFAULT_ACCOUNT'],
        'region': process.env['CDK_DEFAULT_REGION']
    }
})

app.synth()
You are now finished with the source code, and can commit and push everything to your GitHub repo.
Deploy the Pipeline
We can finally deploy the pipeline. But before we do that, do first a cdk synth command to ensure we don't have any errors in our setup. The command should return the complete CloudFormation stack of the Vapor microservice pipeline.
Now we can do the cdk deploy command. When you are asked if you want to deploy the changes, type y. You can check the progress in the AWS CloudFormation console. A new stack CicdUsersInfraStack is created.
I have seen that the AppDeployLocal stage is giving an error. If that happens, go into the CloudFormation console and delete the ProductManager stack which is showed in red. If you check the git status in Terminal, you will probably see that there is a file cdk.context.json that needs to be committed and pushed. Check first that the VPC id, subnet IDs and security group ids are correct in the file, by comparing them to what is shown in the AWS console.
Test ProductsService
Now that we have both UsersService and ProductsService up and running, it is better to use an REST API application to test with. I like using the macOS application Paw for this, but you should use whatever program that you are familiar with.
The UsersService and ProductsService services have their own Load Balancer domain names, so make sure that you have the domain names for UsersService and ProductsService in your Environments: 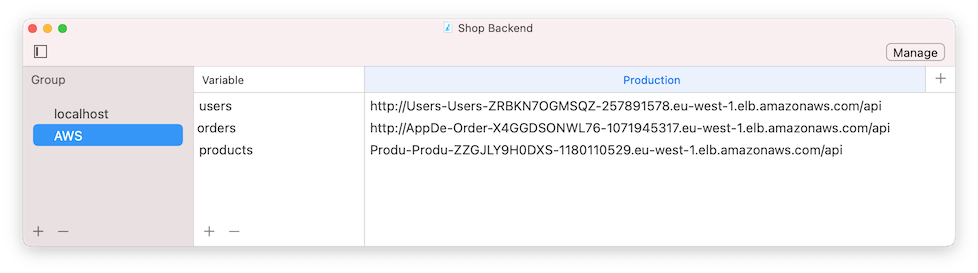
You should first login with UsersService: 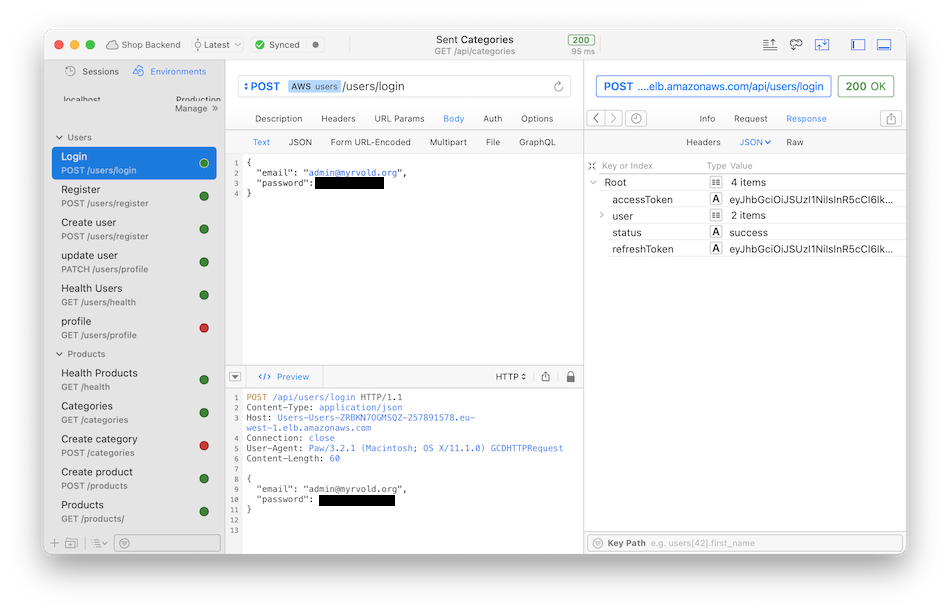
Then make sure that you have linked the Key Path for accessToken in the Authorization header value like this: 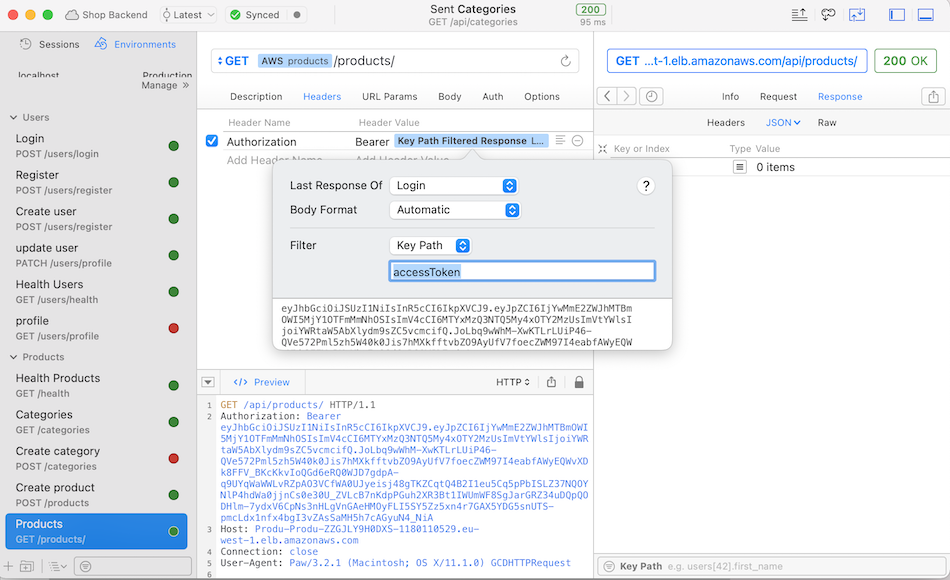 You should be able to create new products, and list products in the database.
Conclusion
We have now a UsersService that is running in it's own microservice, but provides accessToken to other microservice. If you push new updates to any of the microservices, the pipeline will spin up a new docker container service in the ECS Fargate services, and replace the old one. That was the goal of this exercise, to see if we could have several microservices working together to form an application running in AWS. The last piece of this blog post series will add the ProductsService microservice, and focus more on how these services work together.