Published 2021-02-13
Vapor Microservices CI/CD in AWS Part 1
I have been struggling with how to do a continuous delivery of microservices with Cloud Development Kit (CDK), but I think I now have a setup that works fine.The idea of microservices is that they should be small individual services that together makes a complete application. I wanted to use CDK to easily set up a microservice, but use the same database across all microservices. I like using MongoDB, so this blog post will show how to use MongoDB Atlas as the common database.
I am using the same three microservices as shown in the Hands-On Swift 5 Microservices Development: Build microservices for mobile and web applications using Swift 5 and Vapor 4 book from Ralph Kuepper, and most of the Vapor Swift code is taken from the book, but modified slightly to use MongoDB database. The CDK code is in TypeScript.
Every microservice will have it's own Git repository in GitHub, and the repository contains both the Vapor source code, and the AWS infrastructure code using CDK. Because I want to share some of the AWS infrastructure, as VPC, security groups and subnets, this is all set up with the UsersService microservice, and shared with the other two microservices ProductsService and OrdersService. This means that the UsersService microservice must be the first microservice to be deployed.
Project setup
Make sure to have aws cli installed, using the AWS installation guide Installing, updating, and uninstalling the AWS CLI version 2 on macOS.
Make a new project and give it a name. I call mine Shop:
mkdir Shop && cd Shop
This folder will contain all the three microservices. I have prepared a template repository for UsersService. Use this template to create a new GitHub repository in your GitHub account, and give it a name. I named my UsersService.
You also need to make a Personal access token in GitHub for your UsersService repository. Go to Settings/Developer settings/Personal access tokens and click on the Generate new token button. Click on the first checkbox repo Full control of private repositories, or choose a more restrictive access for your token. Click on Generate token and copy the token to your clipboard.
Create a new secret with Secrets Manager for your token:
aws secretsmanager create-secret \--name github-token \--secret-string <github token>
Now, clone your newly created repository inside the Shop folder:
git clone https://github.com/<your account>/UsersService.git
Now that we have the UsersService in it's own folder, we can open it up with Xcode:
cd UsersService
open Package.swift
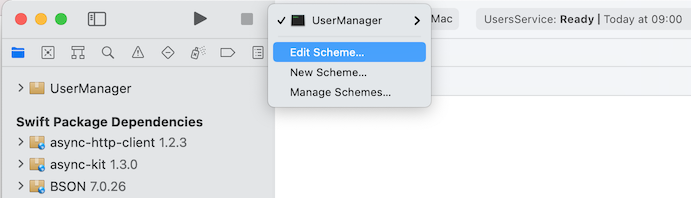
To be able to test the service locally, so that Vapor can read the .env.development file, click first Edit Scheme... in Xcode:
and then set the working directory to the folder UsersService: 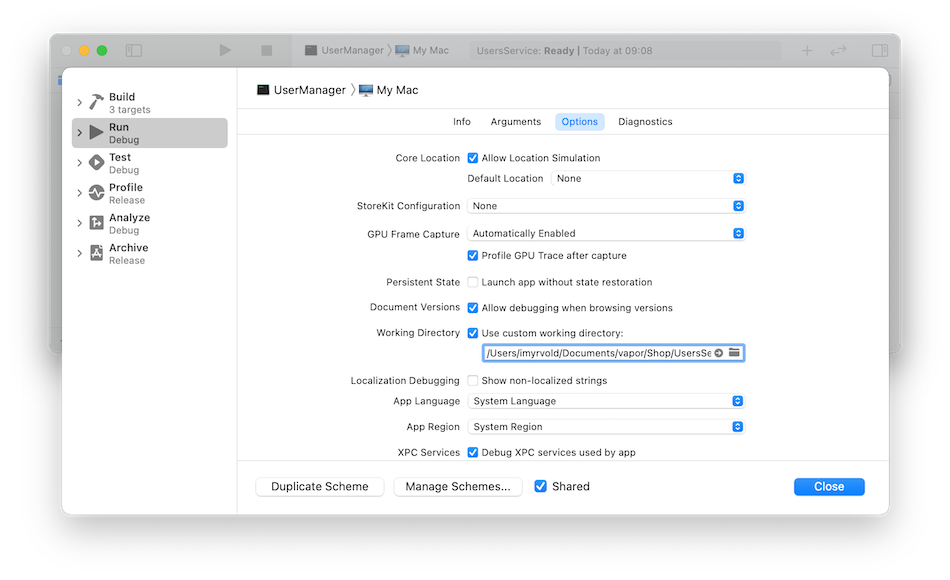
Database
To be able to follow my setup, you need to have a MongoDB Atlas account. You can get a free account here. When you have signed in, follow the documentation to copy the connection string (section 4). Choose "Connect Your Application". It should look like this: mongodb+srv://<username>:<password>@clusterxxxx.mongodb.net/<dbname>?retryWrites=true&w=majority. Fill in your mongodb username and password, and use Shop for dbname (or any name you want to use).
Make a new file with name .env.development, and add the environment variable to the file like this:
MONGODB='<mongodb connection string>'
JWT
We need a JWKS Keypair that is used to sign and verify users. Go to the mkjwk web site and create a new key pair. Use Key Size 2048, Signature for Key Use, and choose RS256 as Algorithm. The last field Key ID you can use backend. Copy the Public and Private Keypair Set to clipboard.
The string you just copied needs to be stripped for newlines before it can be stored as an environmental variable JWKS_KEYPAIR in .env.development. One way to do it is like the following. Enter the command below in Terminal, and substitute the <keypair string with the actual JWKS Keypair string you copied from the website:
echo JWKS_KEYPAIR='<keypair string>' | tr -d '\n' Copy the output from the command, starting from JWKS_KEYPAIR={ "keys": [ and ending with the last curly brace. Don't copy the trailing percent character, and store it in .env.development.
Sendgrid
SendGrid is used to send email when a user registers in UsersService. Go to SendGrid web site and create a user, and make a new API Key. Store the API Key as an environmental variable like this:
echo SENDGRID_API_KEY=<your API Key> in the file .env.development. If you don't care about receiving the confirmation email when you register a new user, just set the API key to a random string.
Admin user
The admin user is seeded to the database when the application is run the first time. Add the email and password to the .env.development file, with the environment variables ADMIN_USERNAME and ADMIN_PASSWORD.
Testing UsersService locally
I have found that MongoDB Compass to be a useful tool to see the structure of your MongoDB database. You can download it here.
Start the UsersService in Xcode, and check that the Shop database (or whatever you named it) have been created, and the collection users have one document with the username you specified in the environment variable ADMIN_USERNAME. The password is hashed.
You can also try out the following curl command, to see that you can login:
curl -i --request POST \--header "Content-Type: application/json" \--data '{ "email": "<email>", "password": "<password>" }' \http://localhost:8080/api/users/login
Use your own username and password here, the same as in the environment variables.
If everything worked out, you should now have received a statusCode 200, with a JSON body that contains "status": "success" and both accessToken and refreshToken.
CDK Setup
Using Cloud Development Kit (CDK) with the pipelines construct is a great way to setup a CI/CD pipeline for the microservice. Start by making a new folder directly under the UsersService folder:
mkdir cdk && cd cdk
If you haven't installed Node.js, do that with brew install node.
Then initialize cdk with the TypeScript language:
cdk init --language typescript You could use another language if you want, like JavaScript, Python, C#, Java.
Open up the project with Visual Studio Code: Add the following to the cdk.json file:
"@aws-cdk/core:newStyleStackSynthesis": true
We are now ready to add the infrastructure code to deploy the microservice to AWS.
Use AWS Secrets Manager to keep the secrets
When we tested the microservice locally, we used environment variables which Xcode copied from the .env.development file. When we create the Vapor app docker container in AWS, we need a way to get AWS to supply the same environmental variables. I have used the AWS Secrets Manager for this. By storing the environment variables here, we have access to them from all microservices.
Add the MongoDB connection string to the Secrets Manager, and use a key string that gives an indication of what is stored:
aws secretsmanager create-secret \--name prod/service/Shop/mongodb \--secret-string "mongodb+srv://..." Use the same connection string that you have stored in the .env.development file.
Do the same with the JWKS_KEYPAIR environment variable:
aws secretsmanager create-secret \--name prod/service/jwt/jwkskeypair \--secret-string '{ "keys": [ { "p":....
and the SENDGRIDAPIKEY environment variable:
aws secretsmanager create-secret \--name prod/service/sendgrid \--secret-string '<Sendgrid API Key>'
To seed the database with an admin user and admin password, we can store the password in the Secrets manager with:
aws secretsmanager create-secret \--name prod/service/Shop/adminpassword \--secret-string '<password>' Use whatever password you want here.
Setup of Vapor app and mongo container into ECS docker containers
We need to install some @aws-cdk dependencies first with npm, so we can use them in CdkStack:
npm install @aws-cdk/aws-ec2 @aws-cdk/aws-ecs @aws-cdk/aws-ecs-patterns @aws-cdk/aws-ecr @aws-cdk/aws-iam @aws-cdk/aws-secretsmanager
Remove everything from the file cdk-stack.ts, and add this to the top of the file:
import { Stack, Construct, StackProps, CfnParameter } from '@aws-cdk/core'
import { Vpc } from '@aws-cdk/aws-ec2'
import { FargateTaskDefinition, Cluster, ContainerImage, LogDriver, Secret } from '@aws-cdk/aws-ecs'
import { ApplicationLoadBalancedFargateService } from '@aws-cdk/aws-ecs-patterns'
import { Repository } from '@aws-cdk/aws-ecr'
import { ServicePrincipal, Role, ManagedPolicy} from '@aws-cdk/aws-iam'
import * as secretsManager from '@aws-cdk/aws-secretsmanager'
This imports all the npm dependencies we need in this stack. Add the CdkStack class:
export class CdkStack extends Stack {
  constructor(scope: Construct, id: string, props?: StackProps) {
    super(scope, id, props)

  }
}
Inside the CdkStack constructor, create three variables to keep the secrets from Secrets Manager (use your own AWS Account ID instead of the 0123456789012 below:
const secretMongoDB = secretsManager.Secret.fromSecretCompleteArn(this, 'prod/service/Shop/mongodb', 'arn:aws:secretsmanager:eu-west-1:0123456789012:secret:prod/service/Shop/mongodb-oZHRVQ')
const secretSendgrid = secretsManager.Secret.fromSecretCompleteArn(this, 'prod/service/sendgrid', 'arn:aws:secretsmanager:eu-west-1:0123456789012:secret:prod/service/sendgrid-oUZMO1')
const secretJwksKeypair = secretsManager.Secret.fromSecretCompleteArn(this, 'prod/service/jwt/jwkskeypair', 'arn:aws:secretsmanager:eu-west-1:0123456789012:secret:prod/service/jwt/jwkskeypair-567S6x')
const secretAdminPassword = secretsManager.Secret.fromSecretCompleteArn(this, 'prod/service/Shop/adminpassword', 'arn:aws:secretsmanager:eu-west-1:0123456789012:secret:prod/service/Shop/adminpassword-2ThsHL')
Continue with creating a new Role that will have the policy to execute ECS task, and grant permission to the role to read the secrets from Secrets Manager:
const taskRole = new Role(this, 'BackendTaskRole', {
    roleName: 'BackendECSTaskRole',
    assumedBy: new ServicePrincipal('ecs-tasks.amazonaws.com'),
    managedPolicies: [
    ManagedPolicy.fromAwsManagedPolicyName('service-role/AmazonECSTaskExecutionRolePolicy')
    ]
})
secretMongoDB.grantRead(taskRole)
secretSendgrid.grantRead(taskRole)
secretJwksKeypair.grantRead(taskRole)
secretAdminPassword.grantRead(taskRole)
To be able to create a new ECS Cluster, we need to create a new VPC:
const vpc = new Vpc(this, 'UsersServiceVpc', {
  maxAzs: 3
})

const cluster = new Cluster(this, 'UsersServiceCluster', {
  clusterName: "Shop",
  vpc: vpc
})
We will create two task definition containers, one for the Vapor app, and one for the Mongo database. For the Vapor app we will use the ECR repository with name cdk-cicd/usersapp which have been created by the CicdInfraStack. We keep the tag for the Vapor app container image in the variable imageTag. The vaporApp task definition imports the secrets as environment variables. Add port mappings to port 8080. Note that we imports the secrets from Secrets Manager as environment variables to the task definition, but the ADMIN_USERNAME is not that sensitive that we need to keep it in the Secrets Manager, so we import it directly as an environment variable.
const repository = Repository.fromRepositoryName(this, 'Repository', 'cdk-cicd/usersapp')
const imageTag = process.env.CODEBUILD_RESOLVED_SOURCE_VERSION || 'local'

const taskDefinition = new FargateTaskDefinition(this, 'UsersServiceTaskDefinition', {
  family: "UsersServiceTaskDefinition",
  cpu: 1024,
  memoryLimitMiB: 2048
})

const vaporApp = taskDefinition.addContainer('VaporApp', {
  image: ContainerImage.fromEcrRepository(repository, imageTag),
  logging: LogDriver.awsLogs({streamPrefix: 'users'}),
  memoryReservationMiB: 1024,
  secrets: {
    JWKS_KEYPAIR: Secret.fromSecretsManager(secretJwksKeypair),
    MONGODB: Secret.fromSecretsManager(secretMongoDB),
    SENDGRID_API_KEY: Secret.fromSecretsManager(secretSendgrid),
    ADMIN_PASSWORD: Secret.fromSecretsManager(secretAdminPassword)
  },
  environment: {
    ADMIN_USERNAME: 'admin@myrvold.org'
  }
})

vaporApp.addPortMappings({containerPort: 8080, hostPort: 8080})
The mongo database task definition container is much easier, as we just need to fetch it from the public docker registry. We add port mappings to the mongo port 27017.
const mongo = taskDefinition.addContainer('MongoDB', {
  image: ContainerImage.fromRegistry('mongo:latest'),
  memoryReservationMiB: 1024
})

mongo.addPortMappings({containerPort: 27017, hostPort: 27017})
To complete the CdkStack, we add the Application Load Balancer, and configures the health check path to the same as we configured in the routes.swift file:
const service = new ApplicationLoadBalancedFargateService(this, 'UsersServiceFargateService', {
  serviceName: 'UsersService',
  cluster: cluster,
  cpu: 512,
  desiredCount: 1,
  taskDefinition: taskDefinition,
  publicLoadBalancer: true
})

service.targetGroup.configureHealthCheck({
  path: '/api/users/health'
})
Local Deployment Stage
Before we start with the CI/CD pipeline, we will create the pipeline stage for the deployment of the infrastructure we just added in CdkStack. Add a new file named local-deployment.ts in the lib folder. Add the following code to it:
import { Stage, StageProps, Construct } from '@aws-cdk/core';
import { CdkStack } from './cdk-stack';

export class LocalDeploymentStage extends Stage {
    constructor(scope: Construct, id: string, props?: StageProps) {
        super(scope, id, props);

        new CdkStack(this, 'Users', {
            stackName: 'UsersCdkStack'
        });
    }
}
CI/CD Infra Pipeline
Now we are ready to make the CI/CD pipeline. Make a new file named cicd-infra.ts in the lib folder. It will contain the infrastructure code for the CI/CD pipeline.
The pipeline stack depends on the pipelines and aws-codepipeline-actions, so we need to install these with npm:
npm install @aws-cdk/pipelines @aws-cdk/aws-codepipeline @aws-cdk/aws-codepipeline-actions @aws-cdk/aws-codebuild
Add the code for the CicdInfraStack class:
import { Stack, Construct, StackProps, SecretValue } from '@aws-cdk/core'
import { Artifact } from '@aws-cdk/aws-codepipeline'
import { GitHubSourceAction, CodeBuildAction } from '@aws-cdk/aws-codepipeline-actions'
import { LinuxBuildImage, Project, BuildSpec } from '@aws-cdk/aws-codebuild'
import { Repository } from '@aws-cdk/aws-ecr'
import { Role, ServicePrincipal, PolicyStatement, Effect } from '@aws-cdk/aws-iam'
import { CdkPipeline, SimpleSynthAction } from '@aws-cdk/pipelines'
import { Secret } from '@aws-cdk/aws-secretsmanager'
import { LocalDeploymentStage } from './local-deployment'

export class CicdInfraStack extends Stack {
    constructor(scope: Construct, id: string, props?: StackProps) {
        super(scope, id, props)

    }
}
Inside the constructor, add the code for the pipeline. The sourceArtifact is the artifact that contains the source code pulled from the GitHub repository. The cdkOutputArtifact is the output from the synth action:
const sourceArtifact = new Artifact()
const cdkOutputArtifact = new Artifact('UsersBucket')

const pipeline = new CdkPipeline(this, 'CdkPipeline', {
    pipelineName: 'cdk-users-pipeline',
    cloudAssemblyArtifact: cdkOutputArtifact,

    sourceAction: new GitHubSourceAction({
        actionName: 'DownloadSources',
        owner: '<your GitHub username>',
        repo: 'UsersService',
        branch: 'main',
        oauthToken: SecretValue.secretsManager('github-token'),
        output: sourceArtifact
    }),

    synthAction: SimpleSynthAction.standardNpmSynth({
        sourceArtifact: sourceArtifact,
        cloudAssemblyArtifact: cdkOutputArtifact,
        subdirectory: 'cdk'
    })
})
Next, we creates the repository that will keep the Vapor docker image, creates a build role that is granted the pull and push policy so that the pipeline can pull and push the repository.
const repository = new Repository(this, 'Repository', { repositoryName: 'cdk-cicd/usersapp'})

const buildRole = new Role(this, 'DockerBuildRole', {
    roleName: 'DockerBuildRole',
    assumedBy: new ServicePrincipal('codebuild.amazonaws.com')
})
repository.grantPullPush(buildRole)
We create a buildspec project that uses the buildRole, and adds the policies to the project to read from the Secrets manager.
const mongoSecret = new Secret(this, 'mongodb')

const project = new Project(this, 'DockerBuild', {
    projectName: 'DockerBuild',
    role: buildRole,
    environment: {
        buildImage: LinuxBuildImage.STANDARD_4_0,
        privileged: true,
    },
    buildSpec: this.getDockerBuildSpec(repository.repositoryUri)
})

project.addToRolePolicy(
    new PolicyStatement({
        effect: Effect.ALLOW,
        actions: [
            'secretsmanager:GetRandomPassword',
            'secretsmanager:GetResourcePolicy',
            'secretsmanager:GetSecretValue',
            'secretsmanager:DescribeSecret',
            'secretsmanager:ListSecretVersionIds'
        ],
        resources: [mongoSecret.secretArn]
    })
)
The last in the constructor is the creation of the buildStage that builds the Vapor application with Swift. The buildStage is added to the pipeline as a new stage:
const buildStage = pipeline.addStage('AppBuild');
buildStage.addActions(new CodeBuildAction({
    actionName: 'DockerBuild',
    input: sourceArtifact,
    project: project
}))

// Deploy - Local
const localStage = new LocalDeploymentStage(this, 'AppDeployLocal')
pipeline.addApplicationStage(localStage)
Finally, we add the function getDockerBuildSpec to the CicdInfraStack class, which is used by the buildspec project. The function logs into our private ECR repository before building the Vapor docker image. After the build have completed, the Vapor docker image is pushed to the ECR repository. I have tried to find a way to do incremental building of the Vapor image, but haven't succeeded in that yet, so every build of the Vapor image is a full build every time we push to the GitHub repository:
getDockerBuildSpec(repositoryUri: string): BuildSpec {
    return BuildSpec.fromObject({
        version: '0.2',
        phases: {
            pre_build: {
                commands: [
                    'echo Logging in to Amazon ECR...',
                    '$(aws ecr get-login --no-include-email --region $AWS_DEFAULT_REGION)'
                ]
            },
            build: {
                commands: [
                    'echo Build started on `date`',
                    'echo Building the Docker image...',
                    `docker build -t ${repositoryUri}:$CODEBUILD_RESOLVED_SOURCE_VERSION .`
                ]
            },
            post_build: {
                commands: [
                    'echo Build completed on `date`',
                    'echo Pushing the Docker image...',
                    `docker push ${repositoryUri}:$CODEBUILD_RESOLVED_SOURCE_VERSION`
                ]
            }
        }
    })
}
CDK Application
Modify the cdk application entrypoint in the bin/cdk.ts file to load the CicdInfraStack stack. It should look like this:
#!/usr/bin/env node
import 'source-map-support/register'
import { App } from '@aws-cdk/core'
import { CicdInfraStack } from '../lib/cicd-infra'

const app = new App()
new CicdInfraStack(app, 'CicdUsersInfraStack', {
    stackName: 'CicdUsersInfraStack'
})

app.synth()
You are now finished with the source code, and can commit and push everything to your GitHub repo.
Bootstrap AWS environments
Before we can use CDK Pipelines, we must bootstrap the AWS environment. AWS documentation have more information about the bootstrapping.
Make sure you are inside the cdk directory, and do this command in the Terminal:
cdk bootstrap \--cloudformation-execution-policies arn:aws:iam::aws:policy/AdministratorAccess \aws://515051544254/eu-west-1
This will start the bootstrap process. You can see in the AWS CloudFormation console that a new stack named CDKToolkit have been named.
Deploy the Pipeline
When the bootstrap stack have been created and completed, we can finally deploy the pipeline. But before we do that, do first a cdk synth command to ensure we don't have any errors in our setup. The command should return the complete CloudFormation stack of the Vapor microservice pipeline.
Now we can do the cdk deploy command. When you are asked if you want to deploy the changes, type y. You can check the progress in the AWS CloudFormation console. A new stack CicdUsersInfraStack is created.
Test UsersService
When the service is up and running, you can go to the AWS EC2 console, and click on the Load Balancers link on the left side. Select the load balancer, and find the DNS name of the UsersService in the Description tab. Copy the DNS name, and try to login with curl:
curl -i --request POST \--header "Content-Type: application/json" \--data '{ "email": "<admin username>", "password": "<admin password>" }' \<DNS name>/api/users/login
You should now get a result with statusCode 200, and a JSON body with accessToken and refreshToken.