Published 2021-05-01
Rekognition Lambda Function with Swift Part 4
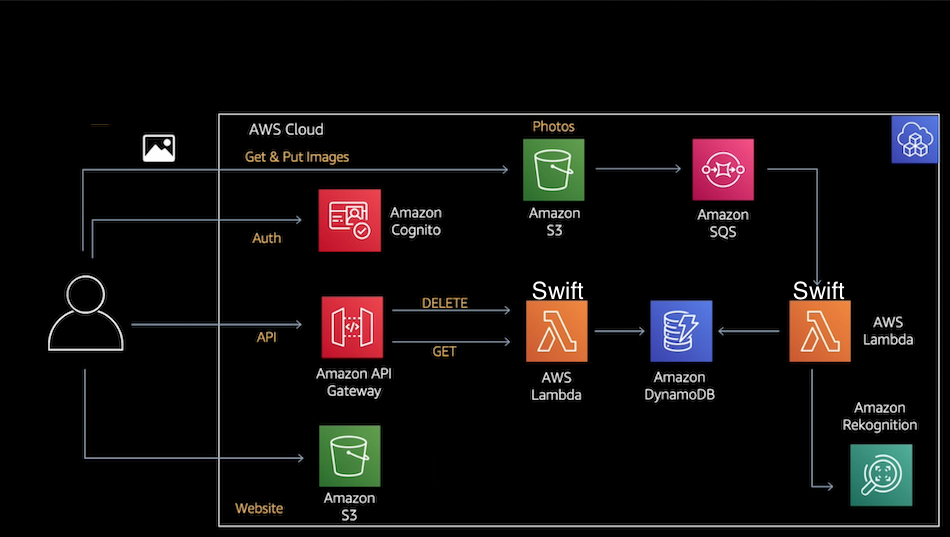
This blog post will build on the three previous episodes, and introduce authentication and authorization with the Amazon Cognito service. Amazon Cognito offers user pools and identity pools, and we will take advantage of that with locking down the access to the API Gateway that we built on the previous episode. We will also use the frontend web application that the authors of the AWS Dev Hour have built.
The full code base is available from my GitHub account, and I have a branch for each part of this series. The branch of this part is part4.
Amazon Cognito
Before we import the Cognito into our CDK infrastructure code, we need to install the CDK construct:
npm install @aws-cdk/aws-cognito
We can now import the apigateway constructs in lib/devhr-project-stack.ts:
import * as cdk from '@aws-cdk/core'
import * as s3 from '@aws-cdk/aws-s3'
import * as lambda from '@aws-cdk/aws-lambda'
import * as dynamodb from '@aws-cdk/aws-dynamodb'
import { Duration } from '@aws-cdk/core'
import * as iam from '@aws-cdk/aws-iam'
import * as event_sources from '@aws-cdk/aws-lambda-event-sources'
import * as cognito from '@aws-cdk/aws-cognito'
import * as apigw from '@aws-cdk/aws-apigateway'
import { AuthorizationType, PassthroughBehavior } from '@aws-cdk/aws-apigateway'
import { CfnOutput } from '@aws-cdk/core'
At the end of the image bucket definition, we will add the constant for imageBucketArn. We will use it later when we define the Cognito service:
// =================================================================================
// Image Bucket
// =================================================================================
const imageBucket = new s3.Bucket(this, imageBucketName, {
  removalPolicy: cdk.RemovalPolicy.DESTROY
})
new cdk.CfnOutput(this, 'imageBucket', { value: imageBucket.bucketName })
const imageBucketArn = imageBucket.bucketArn;
We will do the same for the thumbname S3 bucket:
// =================================================================================
// Thumbnail Bucket
// =================================================================================
const resizedBucket = new s3.Bucket(this, resizedBucketName, {
  removalPolicy: cdk.RemovalPolicy.DESTROY
})
new cdk.CfnOutput(this, 'resizedBucket', { value: resizedBucket.bucketName })
const resizedBucketArn = resizedBucket.bucketArn;
Next comes the definition of the Cognito User Pool Authentication. We starts with the userPool, which will be used to keep the users that registers for the application. We want the users to registers themselves, so we set selfSignUpEnabled to true, and we also want the users to verify their email addresses, so we set autoVerify to true as well. And we set the email as an alias for the username, so we can login using either email or username.
// =====================================================================================
// Cognito User Pool Authentication
// =====================================================================================
const userPool = new cognito.UserPool(this, "UserPool", {
  selfSignUpEnabled: true, // Allow users to sign up
  autoVerify: { email: true }, // Verify email addresses by sending a verification code
  signInAliases: { username: true, email: true }, // Set email as an alias
})
We will make the application client, which we will call userPoolClient, that enables the frontend application to do an unauthenticated request to Cognito to e.g. reset the password on the behalf of the user, or login the user or register a new user etc.
const userPoolClient = new cognito.UserPoolClient(this, "UserPoolClient", {
  userPool,
  generateSecret: false, // Don't need to generate secret for web app running on browsers
})
To make the user able to upload images to the S3 bucket, we need the identityPool. We want only the user himself to access the photos he uploads to the S3 bucket, so we set the allowUnauthenticatedIdentities to false.
const identityPool = new cognito.CfnIdentityPool(this, "ImageRekognitionIdentityPool", {
  allowUnauthenticatedIdentities: false, // Don't allow unathenticated users
  cognitoIdentityProviders: [
    {
    clientId: userPoolClient.userPoolClientId,
    providerName: userPool.userPoolProviderName,
    },
  ],
})
Next, we will inform the API Gateway that we want to use an authorizer, and that we ant to use Cognito as the authorization type:
const auth = new apigw.CfnAuthorizer(this, 'APIGatewayAuthorizer', {
  name: 'customer-authorizer',
  identitySource: 'method.request.header.Authorization',
  providerArns: [userPool.userPoolArn],
  restApiId: api.restApiId,
  type: AuthorizationType.COGNITO,
})
We will use a IAM role to provide access to the AWS resources. IAM is the Identity and Access Management service that manages the access to AWS services and resources:
const authenticatedRole = new iam.Role(this, "ImageRekognitionAuthenticatedRole", {
  assumedBy: new iam.FederatedPrincipal(
    "cognito-identity.amazonaws.com",
      {
      StringEquals: {
          "cognito-identity.amazonaws.com:aud": identityPool.ref,
      },
      "ForAnyValue:StringLike": {
        "cognito-identity.amazonaws.com:amr": "authenticated",
      },
    },
    "sts:AssumeRoleWithWebIdentity"
  ),
})
Once we have defined this role, we also need to add policies to it to define what the role can actually do. So we add an IAM policy so the role can get objects from an S3 bucket, and put objects to the S3 bucket. We have the cognito identity as a part of the S3 bucket arns, so that only the user can have access to his S3 bucket objects, and not other registered users, because every user gave it's own unique Cognito identity:
// IAM policy granting users permission to upload, download and delete their own pictures
authenticatedRole.addToPolicy(
  new iam.PolicyStatement({
    actions: [
      "s3:GetObject",
      "s3:PutObject"
    ],
    effect: iam.Effect.ALLOW,
    resources: [
      imageBucketArn + "/private/${cognito-identity.amazonaws.com:sub}/*",
      imageBucketArn + "/private/${cognito-identity.amazonaws.com:sub}",
      resizedBucketArn + "/private/${cognito-identity.amazonaws.com:sub}/*",
      resizedBucketArn + "/private/${cognito-identity.amazonaws.com:sub}"
    ],
  })
)
An we also add a policy to the role so it can list objects in the bucket:
// IAM policy granting users permission to list their pictures
authenticatedRole.addToPolicy(
  new iam.PolicyStatement({
    actions: ["s3:ListBucket"],
    effect: iam.Effect.ALLOW,
    resources: [
      imageBucketArn,
      resizedBucketArn
    ],
    conditions: {"StringLike": {"s3:prefix": ["private/${cognito-identity.amazonaws.com:sub}/*"]}}
  })
)
We add an attachment so we can attach the role to the identity pool. This makes the user able to access his own resources:
new cognito.CfnIdentityPoolRoleAttachment(this, "IdentityPoolRoleAttachment", {
  identityPoolId: identityPool.ref,
  roles: { authenticated: authenticatedRole.roleArn },
})
The last step is just for convenience, to output the resources we have created to the terminal.
// Export values of Cognito
new CfnOutput(this, "UserPoolId", {
  value: userPool.userPoolId,
})
new CfnOutput(this, "AppClientId", {
  value: userPoolClient.userPoolClientId,
})
new CfnOutput(this, "IdentityPoolId", {
  value: identityPool.ref,
})
The only thing we need to change in the devhr-project-cicd-infra.ts file is the branch from part3 to part4 in the pipeline sourceAction:
sourceAction: new codepipeline_actions.GitHubSourceAction({
    actionName: 'DownloadSources',
    owner: 'imyrvold',
    repo: 'DevhrProjectCICD',
    branch: 'part4',
        oauthToken: cdk.SecretValue.secretsManager('github-token'),
        output: sourceArtifact
}),
We have now finished the infrastructure code for this episode. We don't need to do any changes to the Swift Lambda code, and the only thing left is to test the frontend.
Test the frontend web application
With Terminal, bootstrap the infrastructure code:
cdk bootstrap \
--cloudformation-execution-policies arn:aws:iam::aws:policy/AdministratorAccess \
aws://<your AWS Account ID>/eu-west-1
and deploy it: cdk deploy
Clone the AWS Dev Hour frontend application to your disk, and use npm to install it: npm install
Before we can start the application, we need to copy some resources we have created to the frontend file src/config.json. First, use the aws cli command to list out the user-pool we have created:
aws cognito-idp list-user-pools --max-results 5
This should give the result like this:
{
    "UserPools": [
        {
            "Id": "eu-west-1_QKawsWm3V",
            "Name": "UserPool6BA7E5F2-znAcbaOnreid",
            "LambdaConfig": {},
            "LastModifiedDate": "2021-05-01T09:56:10.193000+02:00",
            "CreationDate": "2021-05-01T09:56:10.193000+02:00"
        }
    ]
}
Copy the Id from the json to the USER_POOL_ID in the src/config.json file.
Find the identity pool id with:
aws cognito-identity list-identity-pools --max-results 5
This should print out a json like the following:
{
    "IdentityPools": [
        {
            "IdentityPoolId": "eu-west-1:4f8249b9-a2f1-4813-93a5-a04cdd930c21",
            "IdentityPoolName": "ImageRekognitionIdentityPool_V2XwAOgu1yiI"
        }
    ]
}
Copy the IdentityPoolId from the json to the IDENTITY_POOL_ID in the src/config.json file.
Use the user pool id we found previously to get the application client id:
aws cognito-idp list-user-pool-clients --user-pool-id eu-west-1_QKawsWm3V
This prints out a json like the following:
{
    "UserPoolClients": [
        {
            "ClientId": "4c9ud82a5o96r5q09ov719tnfa",
            "UserPoolId": "eu-west-1_QKawsWm3V",
            "ClientName": "UserPoolClient2F5918F7-UFA6ggfJnWyL"
        }
    ]
}
Copy the ClientId to the APP_CLIENT_ID in the src/config.json file.
Also set the REGION in the src/config.json file to the region you use. I set mine to eu-west-1.
Last, to get the rest api id, which is a part of the invoke URL, use the following command:
aws apigateway get-rest-apis
This should print out something similar to this:
{
    "items": [
        {
            "id": "026gop6tnd",
            "name": "imageAPI",
            "createdDate": "2021-05-01T09:56:08+02:00",
            "apiKeySource": "HEADER",
...
...
...
The invokeUrl in the src/config.json can be constructed by adding the rest api id to the url: https://